FAQ
How do I split a receipt across several accounts automatically (allocation accounts)?
An allocation account is a stored distribution rule. You define once how an amount is to be split – when posting, Business Central creates the partial entries automatically, including the proportional input VAT. The feature is standard in Business Central (from version 24); no additional extension is required.
Typical use cases:
Entertainment expenses: 70 % deductible, 30 % non-deductible
Annual licences or rent that is allocated across several cost centers or G/L accounts
Collective invoices that are always split by the same key
Instead of splitting every journal line by hand, you simply select the appropriate allocation account in the general journal – including the CIRCULA journal from the section “Reviewing the general journal”.
Tipp
Example used in this section: Travel expenses of EUR 100.00 net are posted to G/L account 6640. Via the allocation account “70/30 SPLIT” this automatically becomes EUR 70.00 on 6640 and EUR 30.00 on 6644 (entertainment expenses, non-deductible) – the input VAT is split in the same ratio (EUR 13.30 / EUR 5.70).
Prerequisites
The destination accounts exist in the chart of accounts and are set up as posting accounts with Direct Posting enabled.
You are allowed to personalize pages (step 3) – this is a pure user setting, not a system change.
You are working in a general journal (in the Circula context: journal batch name “CIRCULA”).
Step 1: Create the allocation account
Open the global search (Alt + Q), enter “Allocation Accounts” and open the page.
Choose “New”. The “Allocation Account” card opens.
Fill in the header fields:
| Field | Value in the example | Explanation |
|---|---|---|
| No. | 70/30 SPLIT | Unique code, freely selectable. Use a self-explanatory name. |
| Name | 70/30 Split | Plain text, shown in the lookup list. |
| Account Type | Fixed | “Fixed” = fixed shares. “Variable” = the distribution is calculated at runtime (e.g. by balance or dimension values). |
| Document Line Split | Split Amount | The amount of the journal line is split according to the shares. |
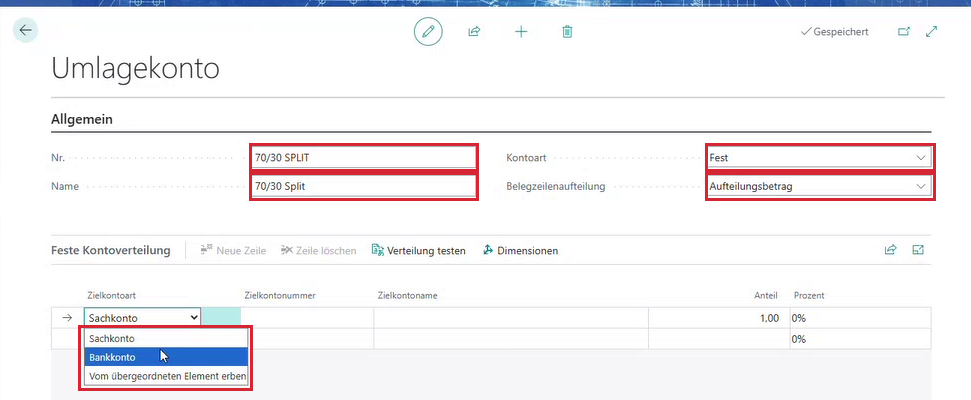
Step 2: Enter the fixed account distribution
In the “Fixed Account Distribution” section you define one destination and its share per line.
| Line | Destination Account Type | Destination Account No. | Share | Result |
|---|---|---|---|---|
| 1 | Inherit from Parent | – (left empty) | 70.00 | 70 % remain on the account of the journal line (here 6640) |
| 2 | G/L Account | 6644 | 30.00 | 30 % are reposted to 6644 |
Business Central calculates the “Percent” column itself from the shares – after the second line it shows 70 % / 30 %. The shares are pure ratios; they do not have to add up to 100 (30 / 70 would give the same result as 3 / 7).
Use “Test Distribution” to verify the split before you put the allocation account to use. With “Dimensions” you can additionally pass cost centers per line.
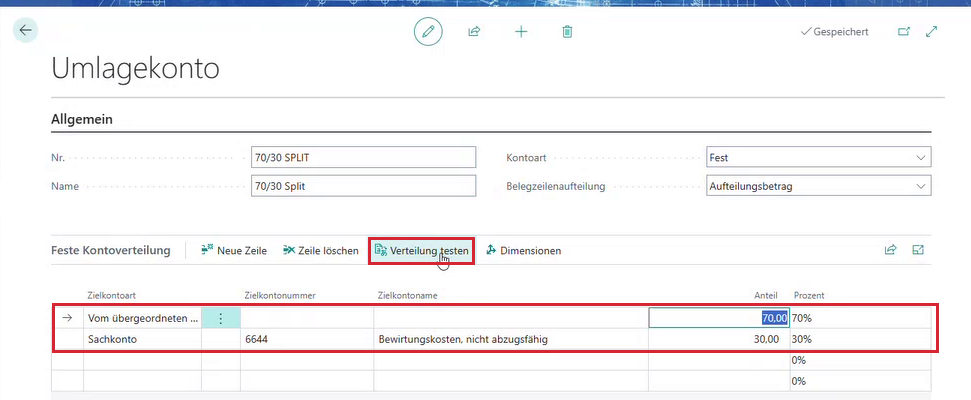
Tipp
Why “Inherit from Parent”? This way the original account does not have to be hard-coded in the allocation account. The same allocation account therefore works for every journal line – regardless of which expense account it uses.
Step 3: Show the “Allocation Account No.” column
The column is hidden in the general journal by default. You show it once per user.
Open “General Journals” and select the required journal batch (e.g. “CIRCULA”).
Click the gear icon in the top right corner and choose “Personalize”.
In the personalization bar, click “+ Field”.
In the “Add a field to the page” pane, search for “Allocation Account No.” and drag the field to the required position in the line table.
Optionally show the “Allocation Accounts Modified” field as well – it indicates whether the distribution was adjusted manually for that line.
Finish with “Done”.
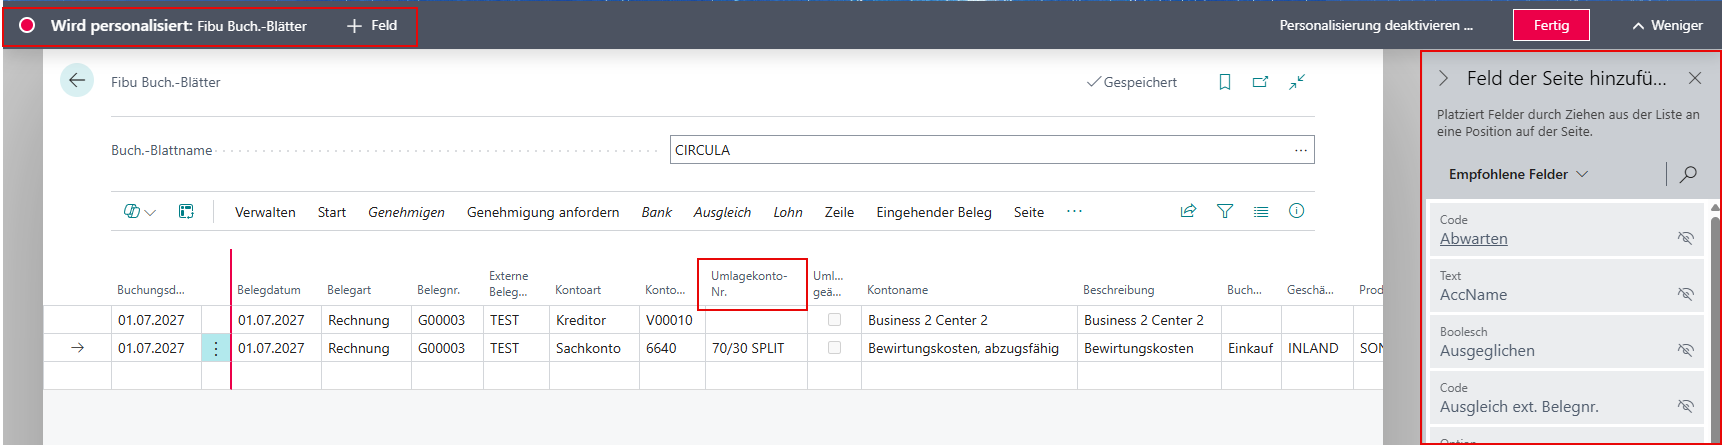
Warnung
Pitfall: Sometimes the newly inserted field cannot be selected afterwards (it stays greyed out or does not open a lookup list). Remedy: open Personalize again, remove the field, insert it again, then close and reopen the page (or press F5). Make sure to insert the field only once – inserting it twice shows the column twice.
Step 4: Assign the allocation account in the journal line
Open the journal and enter the required allocation account in the “Allocation Account No.” column on every line that is to be split – “70/30 SPLIT” in this example.
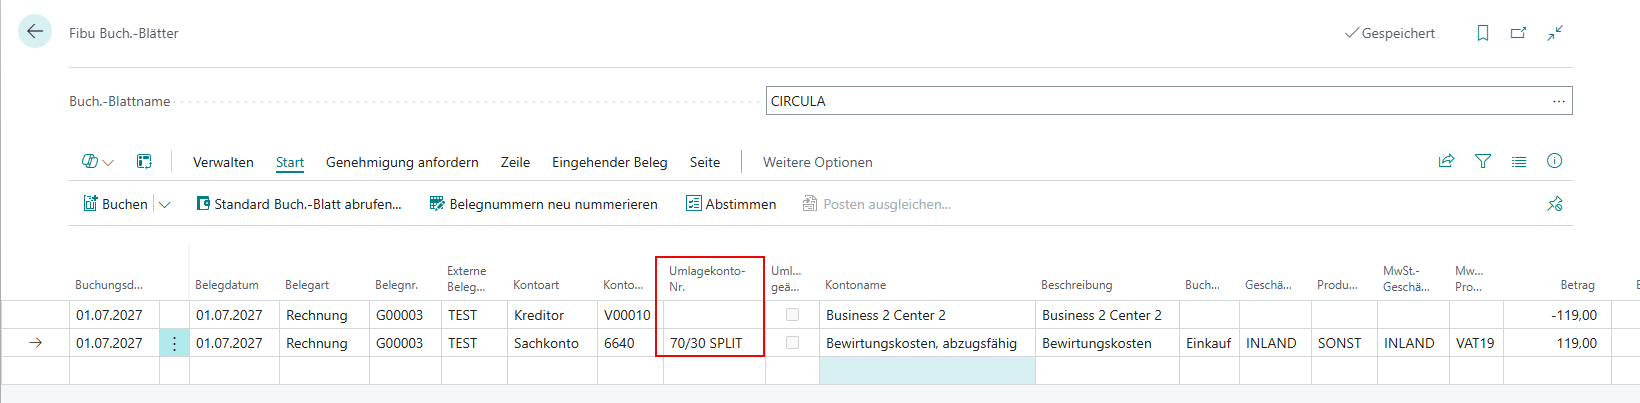
Warnung
Assignment per journal line: An allocation account cannot currently be stored permanently on a G/L account – it has to be selected on each journal line individually. For the Circula Expenses Connector it is planned to pass the allocation account automatically based on the G/L account in a future version.
Step 5: Check the posting preview
Always check the preview before posting: “Post → Preview Posting”, then open “G/L Entries”.
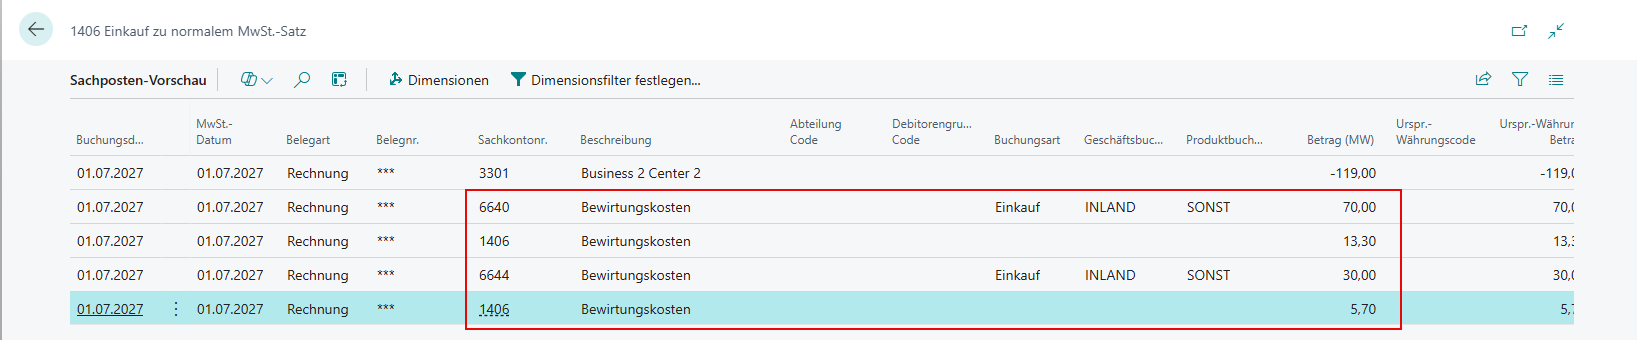
Check in particular:
Are the destination accounts and the amounts correct?
Is the input VAT split correctly?
Are the dimensions (e.g. cost center, cost unit) set on all partial lines?
Step 6: Post and verify the result
Post the journal as usual (“Post” or F9) and confirm the prompt with “Yes”.
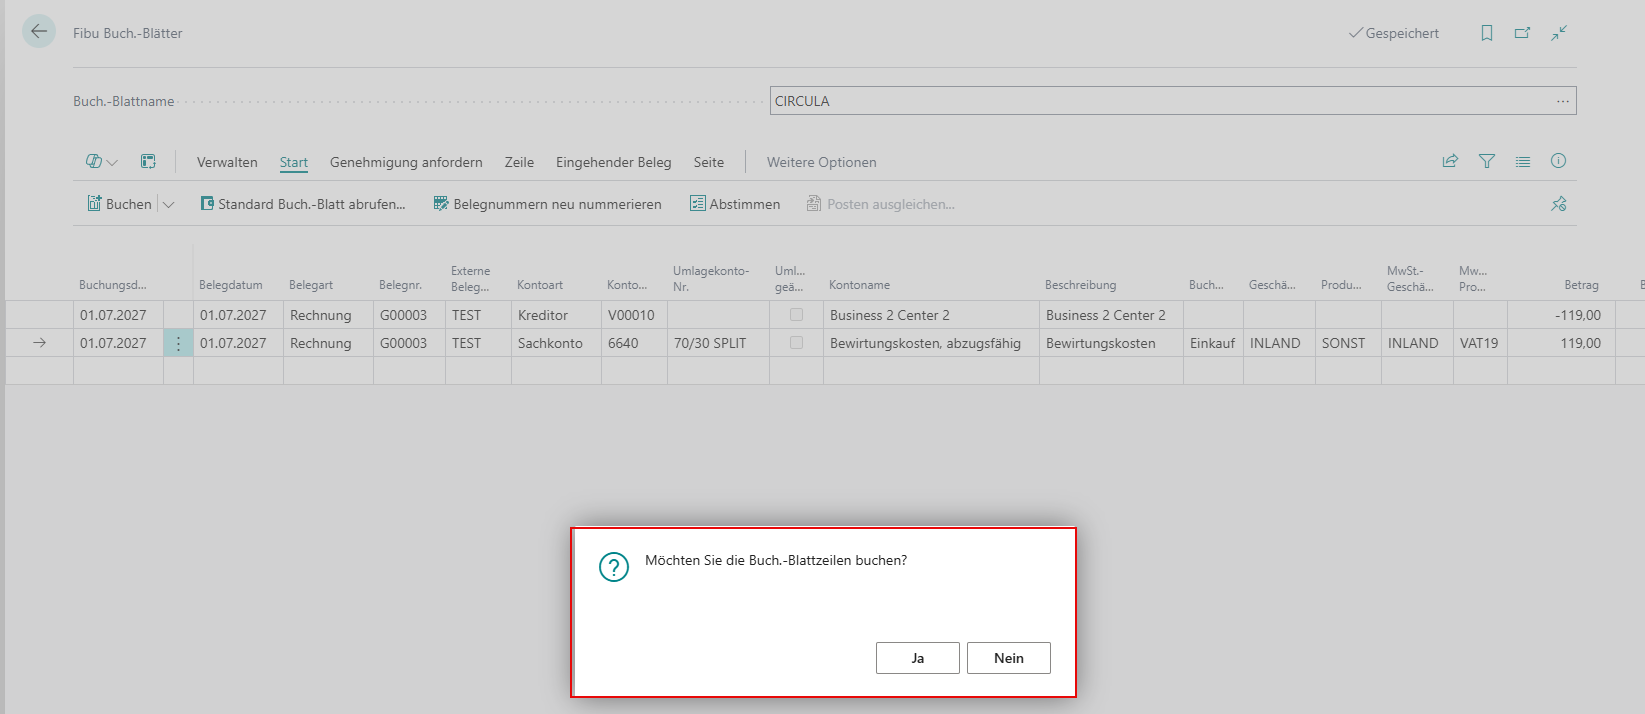
After posting:
The G/L entries show the split amounts on both accounts.
The document link is preserved: the Circula receipt is also attached to the split entries.
From the Circula expense log you can jump straight to the posting and the original document via “Open G/L Entries”, “Open General Journal” and “Circula Receipt”.
Allocation accounts quick reference
| Step | Location in Business Central | Action |
|---|---|---|
| 1 | Global search (Alt + Q) → Allocation Accounts | “New” – No., Name, Account Type “Fixed”, Document Line Split “Split Amount” |
| 2 | Allocation account card → Fixed Account Distribution | Line 1: “Inherit from Parent”, share 70 – line 2: G/L account 6644, share 30 |
| 3 | General Journals → gear icon → Personalize | Show the “Allocation Account No.” field (one-off) |
| 4 | General journal (e.g. “CIRCULA”) | Set the Allocation Account No. per line |
| 5 | Post → Preview Posting → G/L Entries | Check the split and the input VAT |
| 6 | Post (F9) | Post and verify the G/L entries |
Known limitations
No fixed assignment on the G/L account: the allocation account has to be selected on every journal line individually.
Personalization: the “Allocation Account No.” field occasionally does not respond after being inserted – remove the field, insert it again, reload the page.
Circula Expenses Connector: passing the allocation account automatically per G/L account is still open and is being evaluated as an extension.
Account Type “Variable”: for balance- or dimension-based distributions (e.g. allocation by actual cost center shares) instead of fixed percentages – not covered in this section.