Setup
The setup covers three areas: activating the app (installation and licensing via the activation wizard), the functional configuration of the connector (connection to Circula, posting logic, VAT mapping and expense journal setup), and the job queue, which can be used to automate the entire retrieval and processing flow.
Installing the Circula Expenses Connector
Installation is performed via the Microsoft AppSource catalog directly from within Business Central.
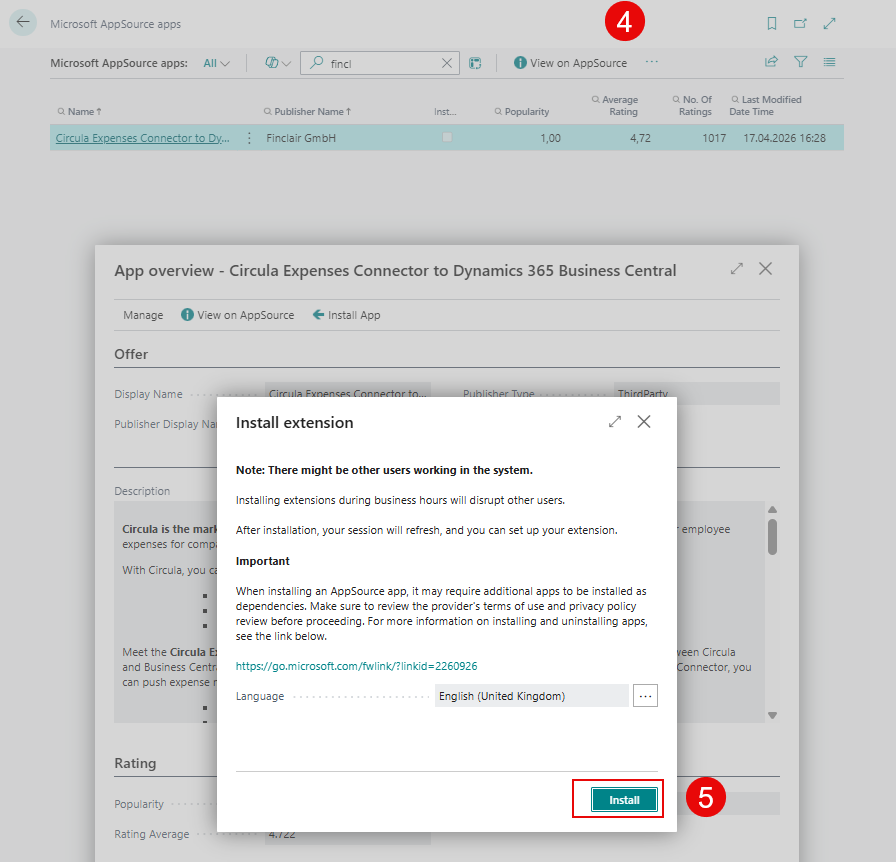
In Business Central, open Extension Management via the global search.
Switch to the AppSource catalog.

Search for “Finclair” and open the entry “Circula Expenses Connector to Dynamics 365 Business Central”.
Click the app name and then “Install app”.
Acknowledge the installation notes and select the desired language (e.g. “English (United States)” or “German (Germany)”).
Click “Install”. The installation takes a few minutes.
Notiz
During installation, a warning may appear that other users may be working in the system. Therefore, perform installations outside of business hours whenever possible.
Activation (activation wizard)
After the installation has finished, the activation wizard for the Circula Expenses Connector starts automatically. The wizard guides you through all steps required for licensing and master-data entry.
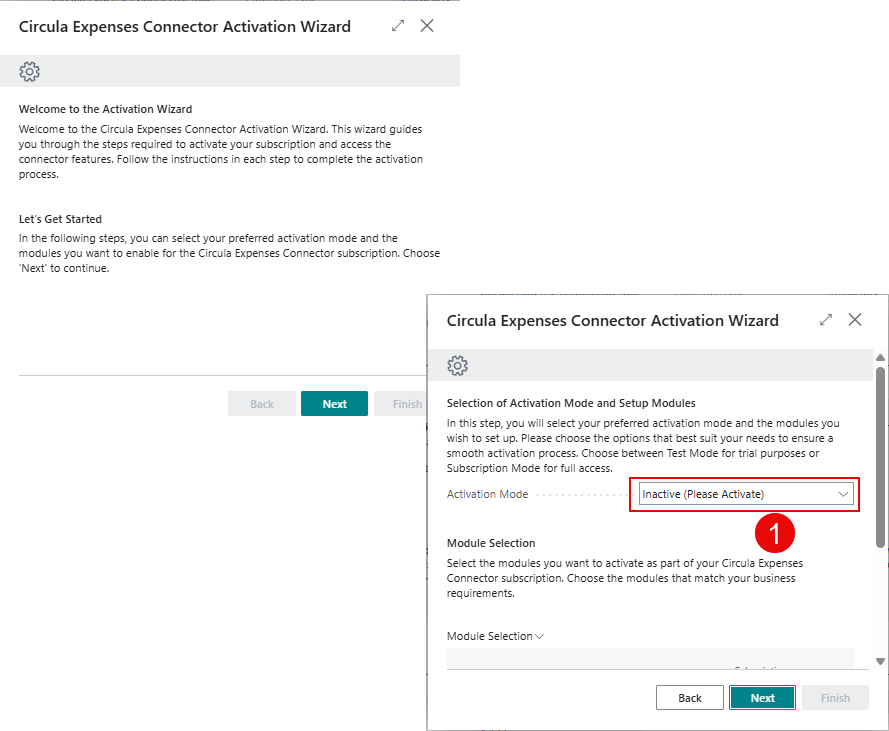
Step 1: Choose the activation mode
In the first step you decide which mode the connector will run in:
Demo: Activates the connector in trial mode so it can be evaluated free of charge.
Subscription: Full, paid licensing with the complete feature set.
In the “Module selection” area you can see the available modules – currently only the Circula Expenses Connector (code CIR01). Then click “Next”.
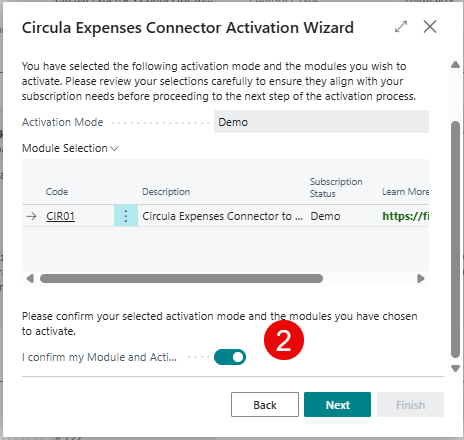
Step 2: Confirm the selection
Confirm the chosen activation mode using the “I confirm my selection …” toggle. By choosing the subscription, you also explicitly confirm that the use is paid.
Step 3: License agreement and privacy policy
The wizard displays the License Agreement and the privacy policy. Read both documents carefully and accept the license agreement. Then click “Next”.
Step 4: Master data and contact information
Enter the company and contact information required for licensing here:
Address, address supplement, city, postal code, country/region code
VAT registration no.: mandatory; for Germany it starts with “DE” followed by nine digits (e.g. DE777777777).
Contact name, contact email (e.g. info@finclair.com), contact phone number
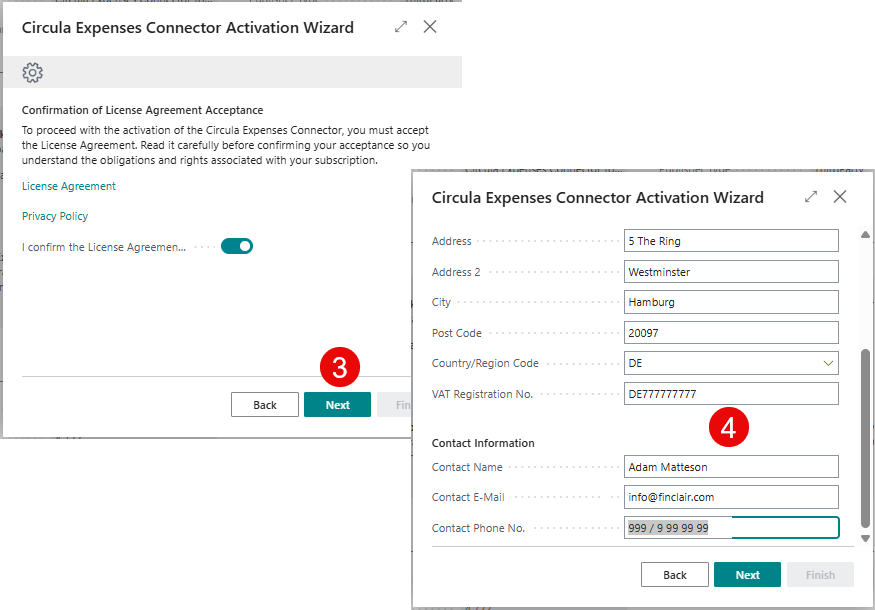
Click “Next” and confirm the correctness of the entered data. The activation is now complete and you can proceed with the configuration of the connector.
Configuring the Circula Expenses Connector
The functional configuration spans three pages in Business Central, all reachable via the global search:
Circula Setup – connection, dimensions, posting logic and vendor creation
Circula VAT Mapping Setup – mapping of VAT percentages
Circula Expense Journal Setup – target journal per expense type
Circula Setup
Open the “Circula Setup” page from the global search. It is divided into four areas: API, Dimensions, Posting and Vendor.
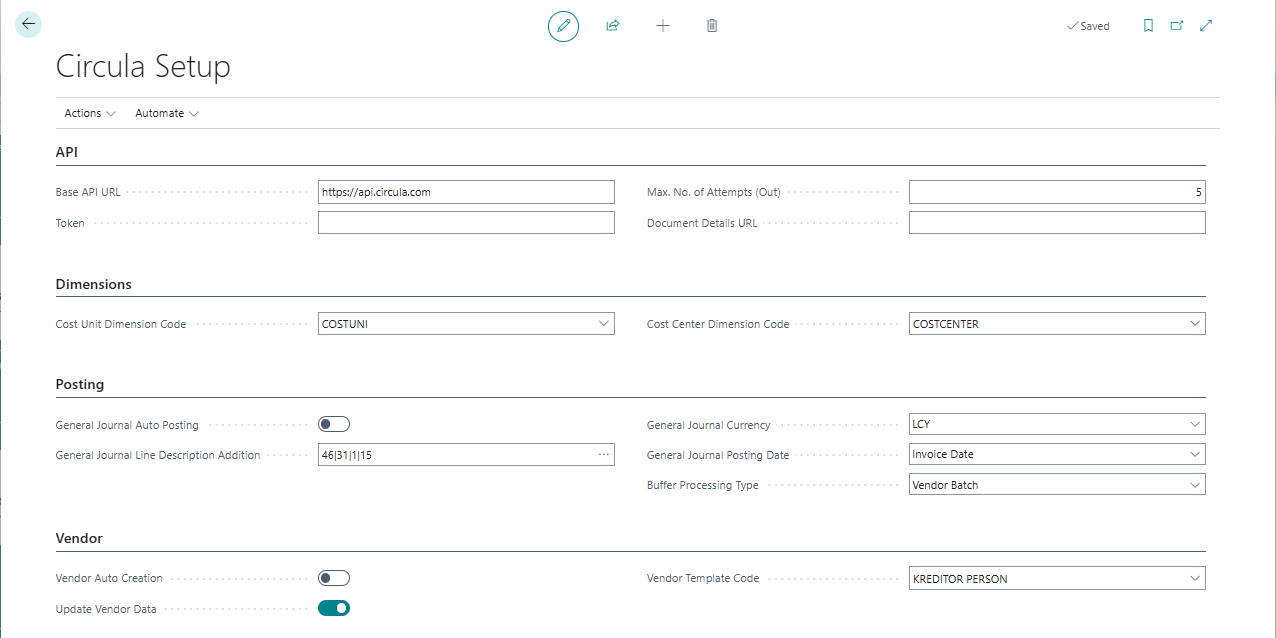
“API” area – connection to Circula
Base API URL: https://api.circula.com
Token: Provided directly by Circula. The token establishes the link to your Circula entity so Business Central is allowed to retrieve the entity’s data.
Max. No. of Attempts (Outgoing): Number of retry attempts in case of transmission errors (keep the default value).
“Dimensions” area – synchronization of cost center and cost unit
Cost Unit Dimension Code: e.g. COSTUNIT
Cost Center Dimension Code: e.g. COSTCENTER
Warnung
The dimensions stored in Circula must be kept in sync with the dimensions in Business Central. The values for cost center and cost unit must be identical on both sides so that the handover works cleanly.
“Posting” area – posting logic in the general journal
General Journal Description Suffix: Free-form text for the posting description. Use the field lookup to combine fields, separated by pipe characters (|), e.g. 46|31|1|15 (Vendor | Invoice ID | Entry Number | Name).
General Journal Currency: We recommend “LCY” (Local Currency). For foreign-currency receipts the EUR amount already converted in Circula is taken over, avoiding additional exchange-rate differences. Alternatively choose “Original” – then the original currency amount is used and Business Central performs its own conversion (which may diverge from Circula).
General Journal Posting Date: Typically “Invoice Date”. Other options include Workdate, Approval Date or Controlling date.
Buffer Processing Type: “Vendor Batch” recommended. This produces only one vendor line per receipt; the individual VAT rates (e.g. 7 % and 19 %) are split across separate G/L account lines. “Independent” would create one vendor line per VAT rate.
Auto Post General Journal: Toggle that automatically posts the general journal after the import. Recommendation: Only enable this once the coding in Circula is fully final and the accounting team has built up trust in the data. Otherwise leave it off and review the journal manually.
“Vendor” area – creation and update of vendors
Vendor Auto Creation: When enabled, vendors created in Circula that do not yet exist in Business Central are created automatically based on a vendor template.
Vendor Template Code: Template used for automatic vendor creation (e.g. a “VENDOR EMPLOYEE” template with domestic settings and matching posting groups). Name and IBAN of the employee are transferred.
Update Vendor Data: Automatically updates existing vendors when data changes in Circula (e.g. a changed IBAN). All vendor changes are recorded in the Process Log (audit-ready).
Tipp
Initially leave “Vendor Auto Creation” disabled, but enable “Update Vendor Data” so that master-data changes from Circula are taken over automatically.
Circula VAT Mapping Setup
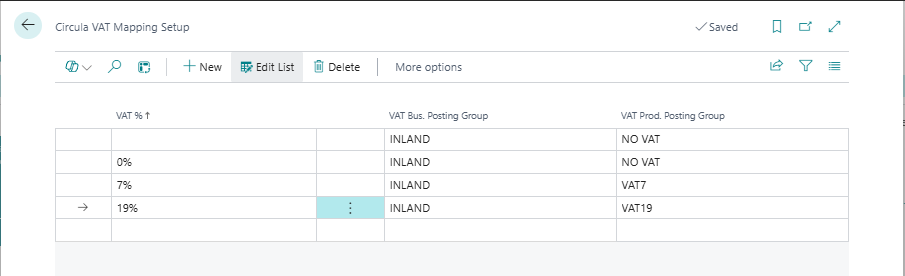
The global search takes you to “Circula VAT Mapping Setup”. Here you map the VAT percentages coming from Circula to the VAT business and product posting groups configured in Business Central.
Recommended default mapping for domestic receipts:
| VAT % (Circula) | VAT Business Posting Group | VAT Product Posting Group |
|---|---|---|
| (empty) | DOMESTIC | NO VAT |
| 0% | DOMESTIC | NO VAT |
| 7% | DOMESTIC | VAT.7 |
| 19% | DOMESTIC | VAT.19 |
Notiz
Foreign cases: If you maintain country-specific rates in Circula (e.g. "AT 21" for Austria), add them here and map them to a matching business posting group such as "EU" combined with e.g. "Reverse Charge". Prerequisite is that the rates are configured accordingly on the Circula side.
Circula Expense Journal Setup
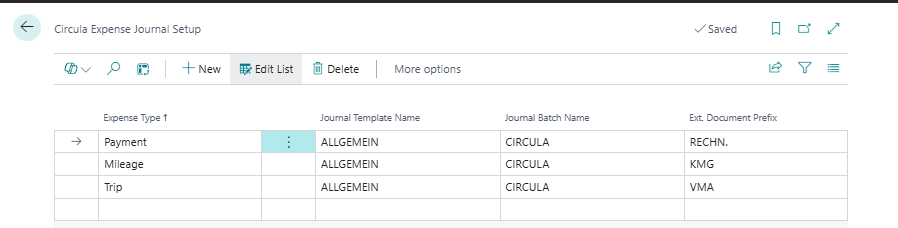
The global search opens “Circula Expense Journal Setup”. Here you define – per expense type – which general journal the receipts are transferred to.
Three expense types are available:
PAYMENT – invoices/receipts (default)
MILEAGE – mileage allowances
TRIP – per-diem / travel expenses
Standard configuration (all expense types use the same journal “CIRCULA”):
| Expense Type | Journal Template Name | Journal Batch Name | Ext. Doc. No. Prefix |
|---|---|---|---|
| PAYMENT | GENERAL | CIRCULA | INVC. |
| MILEAGE | GENERAL | CIRCULA | MIL |
| TRIP | GENERAL | CIRCULA | PER |
Configuration notes:
Journal Batch Name: The journal batch itself (here “CIRCULA”) needs to be created in advance under the “GENERAL” journal template. Recommendation: assign a number series there so the system allocates consecutive document numbers automatically.
Separate journals per expense type: Optionally, use a dedicated journal per expense type. In practice, however, most customers use a shared journal.
Ext. Doc. No. Prefix: Short tag prepended to the external document number on import. This makes it immediately obvious whether a journal line is a payment (INVC.), mileage (MIL) or trip (PER).
Job Queue
The job queue automates every manual step of the expense import. Instead of pulling each receipt from Circula and processing the expense buffer manually, the connector’s codeunits do the work in the job queue – for example every five minutes or at fixed times of day.
In Business Central, search for “Job Queue Entries”. Filter by “FIS” to display the entries shipped with the connector:
FIS API Buffer Creation – Pulls released expenses from Circula and creates entries in the expense buffer.
FIS API Buffer Processing – Processes the buffer entries (status “Pending” → “Ready”).
FIS Expense Buffer Proc. – Transfers the processed entries into the assigned general journal.

Configuring a job queue entry
Open one of the FIS entries by double-clicking it. The most important fields on the card:
Recurring Job: Enable so the entry runs on a schedule.
Run on Mondays … Run on Sundays: Choose the days the job should run.
Starting Time / Ending Time: Active time window per day.
No. of Minutes between Runs: e.g. 5 minutes.
Earliest Start Date/Time: First execution time.
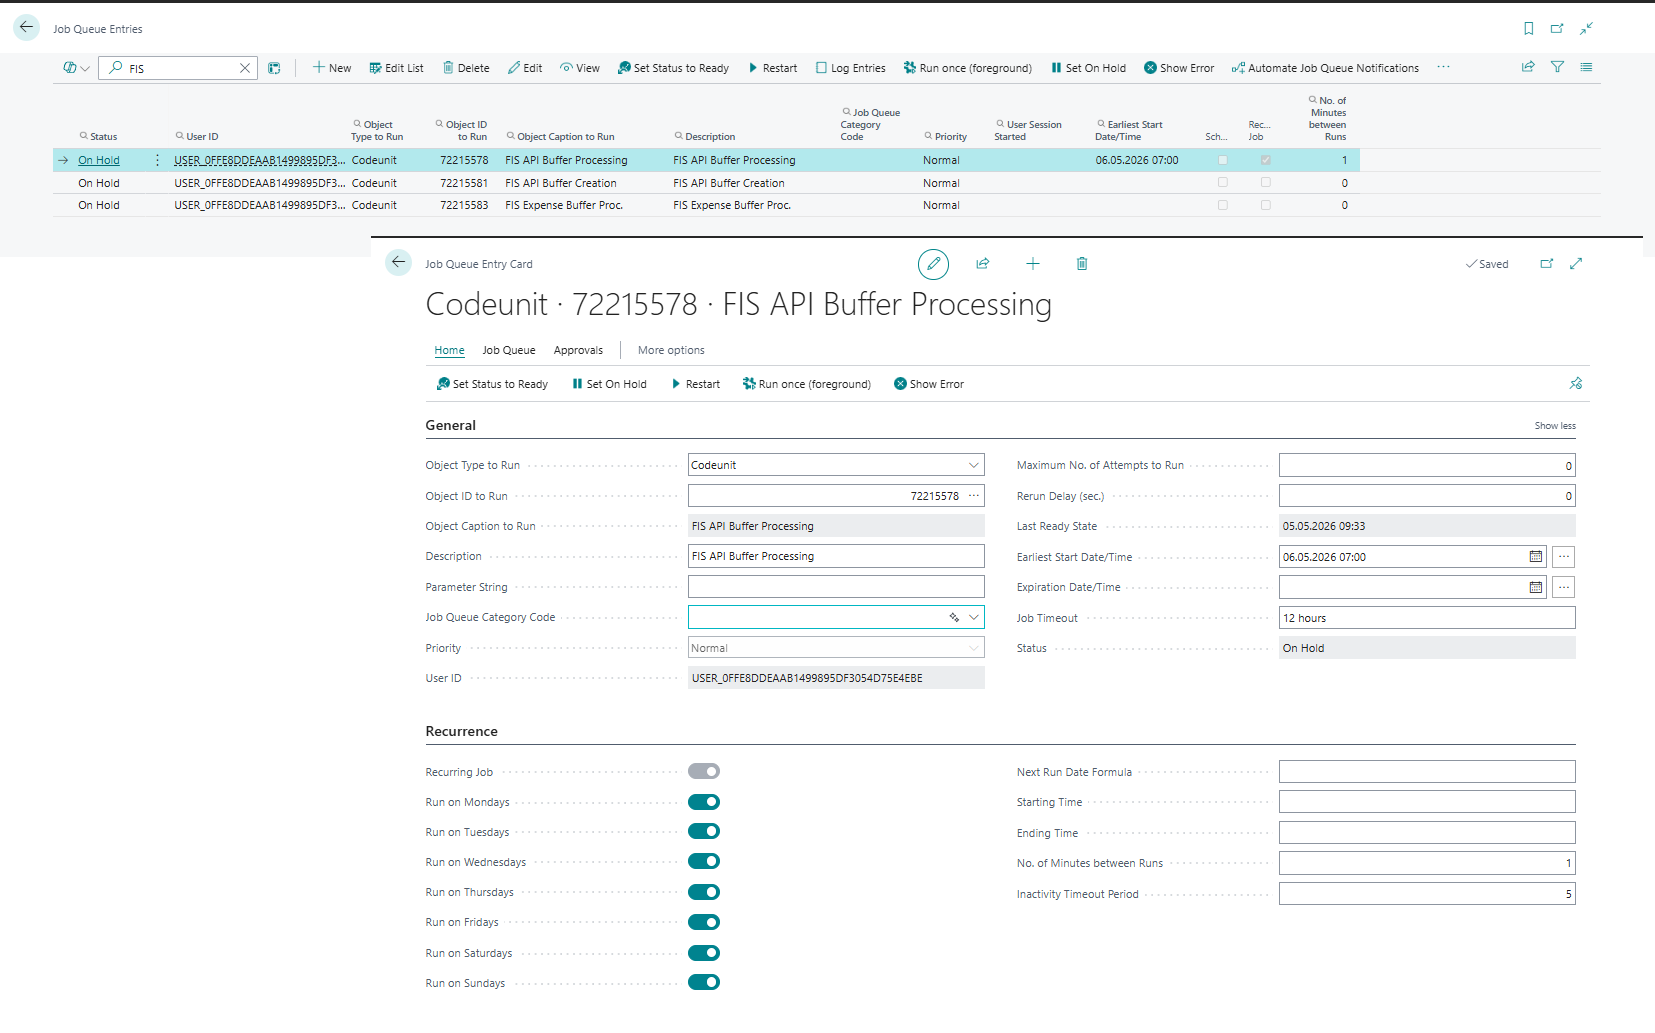
Use “Set Status to Ready” to activate the entry. The status changes from “On Hold” to “Ready” and the job runs according to the configured schedule.
Tipp
Configure all three FIS entries identically (e.g. every 5 minutes, Monday–Friday, 06:00–22:00). This fully automates the entire flow from pulling data out of Circula to populating the general journal. If “Auto Post General Journal” is enabled as well, even the posting itself happens without manual intervention.